Creating succulent spheres are a popular DIY project for many avid succulent collectors to showcase excess of their beautiful collections. With this quick and easy tutorial, you will create your very own hanging Succulent Sphere in no time!

Succulents have quickly become a popular household plant all around the world for many reasons. These plants come in such a unique and diverse range, while being so easy to maintain and care for that it is no question why they have become so popular over the recent years!
They are rather hardy, requiring very little water and maintenance, making them the perfect plant for all kinds of DIY creations and projects, like the Succulent Sphere.
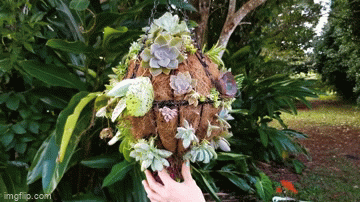
If you are succulent obsessed than you likely have more succulents than you can count. Creating a succulent sphere is a great way to minimise pot space whilst showcasing your beautiful collection from above.
Keep in mind that large succulent spheres like this one will require many succulents in order to look filled - otherwise you can plant less and leave room for the succulents to grow out!
You Will Need:
- 2x hanging baskets
- Cardboard
- Succulent soil mix
- Wire or zipties
- Wire cutters (if using wire)
- Pot or bucket
- Poking tools
- Scissors or stanley knife
- And succulents of course!!
Step 1.
Remove the hanging wires from one of the hanging baskets. You will only need hangers on one basket. Fill both hanging baskets with soil mix compact down but not too firmly, you want to ensure the sphere will be completely full but not incredibly compacted to the point where plant roots struggle to grow
Step 2.
Place the hanging basket with hanging wires still attached, onto the pot or bucket so it is resting in one place, with the hanging wire inside the pot out of the way for now.
Step 3.
Place piece of cardboard on top of one basket and firmly place your hand on top to secure any dirt from falling out. Swiftly flip onto the other basket that is sitting in the pot, then remove the carboard by firmly placing your hand on top of the sphere and gently wiggling the cardboard free. It may help to have someone assist you with this step, otherwise, be patient with yourself!

Step 4.
Now grab your wire or zip-ties - it's time to connect the sphere!! If you are using wire as I have done in the video above, begin wrapping the wire around both of the rims of the sphere that are touching; all the way around. If you are using zip ties, you have made it a whole lot easier for yourself! Begin by connecting the sphere at opposite points until it is secure enough for the two baskets to be intact with no soil falling out. I highly advise using zip ties as it will save a lot of time and effort.
Step 5.
This is the fun part! Grab your scissors or Stanley knife and begin making small holes around the sphere. *You can choose to start with one hole and plant at a time or make a bunch of holes and plant all at once*
*Keep in mind that this first half will be the base of your succulent sphere planter*
Step 6.
Unpot your succulents and remove excess roots only if necessary. Begin by gently working the roots into the hole you just created and work the succulent root-base and stem into the sphere. You may need to poke your finger or any other poking tools (I just used an apple corer & screwdriver) in to create space for the roots and stem to go in. You can use cuttings if you prefer, just keep in mind this will take Step .7 longer and will take the plants longer to establish themselves. Fill in soil around the plant if necessary and rotate sphere as needed. If required, use wire or floral pins to hold succulents in place.

Step 7.
This step is optional though highly recommended. Your first half of the sphere will establish better if left to settle for a week. I personally left my sphere where it was for 1 week to allow the roots to grow into the growing medium. Water as necessary
Step 8.
After letting the first half establish a little, it is time to take the sphere out of the pot, flip it upside down and hang it up to continue working on it. I found when I didn't flip it and worked from underneath the sphere it was incredibly difficult, but turning the first completed side upside down and working from the top made it much easier. Always remember to do what works best for you!
Step 9.
Once you have filled the sphere to your preference, give a good soak of water and some liquid fertiliser (I use Seasol) to boost their growth during these initial stages.
Step 10.
Your beautiful succulent sphere creation is now ready to be hung in a well lit area and enjoyed!

Share your plantiful creations with us on social media @tropiculture_ so that we can share and feature your content! Or head on over to our YouTube channel for more tutorials, tours and how-tos!